Request tour widget
Request Tour Widget
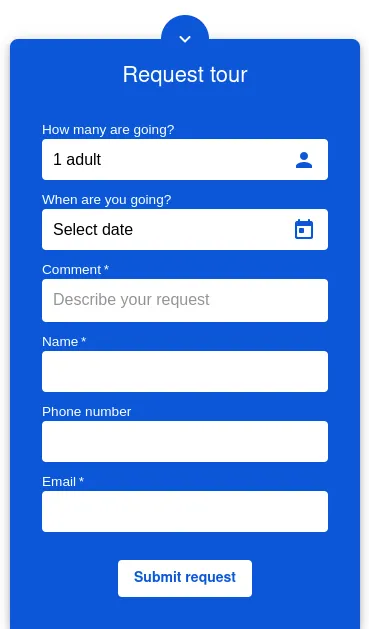
The Request Tour Widget adds a popup form to your webpage, allowing users to make inquiries or requests. Positioned in the lower-right corner, the widget combines the functional capabilities of the Leads Form Widget with the visual style of the Booking Widget.
Key Features
-
Dynamic Inquiry Form Captures user requests, inquiries, or leads in a visually engaging popup format.
-
Customizable Appearance Tailor the title, button text, and thank-you message to suit your brand and user needs.
-
Responsive Design The widget is optimized for devices of all sizes, ensuring a seamless experience.
How to Use
Add the widget to your webpage using the HTML snippet below:
Example:
<bilberry-request-tour></bilberry-request-tour>Widget Properties
| Property | Description | Default Value | Required |
|---|---|---|---|
hide-request-date | Hides the request date input field when set to yes. | no | No |
hide-quantity-picker | Hides the quantity picker (adults/children) when set to yes. | no | No |
expand-arrow-inside | Positions the expand arrow inside the widget when set to yes. | no | No |
disable-title | Set to yes to hide the widget’s title. | no | No |
lazy-load | Set to yes to defer loading the widget content until it is visible in the viewport. Options: yes, no. | no | No |
Text Customization Properties
Customize the widget’s text content using the following properties:
| Property | Description | Default Value |
|---|---|---|
title-text-customization-key | Text for the title displayed in the header. | Unset |
submit-button-text-customization-key | Text for the submit button at the bottom of the form. | Unset |
thank-you-text-customization-key | Text displayed after the user submits a request. | Unset |
Setting Up on Wix
If you’re using Wix as your website builder, follow these steps to configure the widget:
- Access the Configuration Guide: Refer to the relevant guide in these docs for general widget setup on Wix.
- Use the Following Values:
- Server URL:
https://bilberry-widgets.b-cdn.net/v4/wix-wrappers/WixBilberryRequestTour.js - Tag Name:
wix-bilberry-request-tour
- Server URL:
Tips for Effective Integration
- Strategic Placement: Ensure the widget is visible and accessible, as it appears as a popup in the lower-right corner of your webpage.
- Personalized Content: Use text customization properties to align the widget’s messaging with your branding.
- Test Responsiveness: Verify that the widget performs well on different devices and screen sizes.
By integrating the Request Tour Widget, you can seamlessly gather inquiries and leads while offering a user-friendly interface.